# Sheet features
# Issue hierarchy v1.1.0
To indent and group Issues by their default hierarchical relationships in Jira, click the
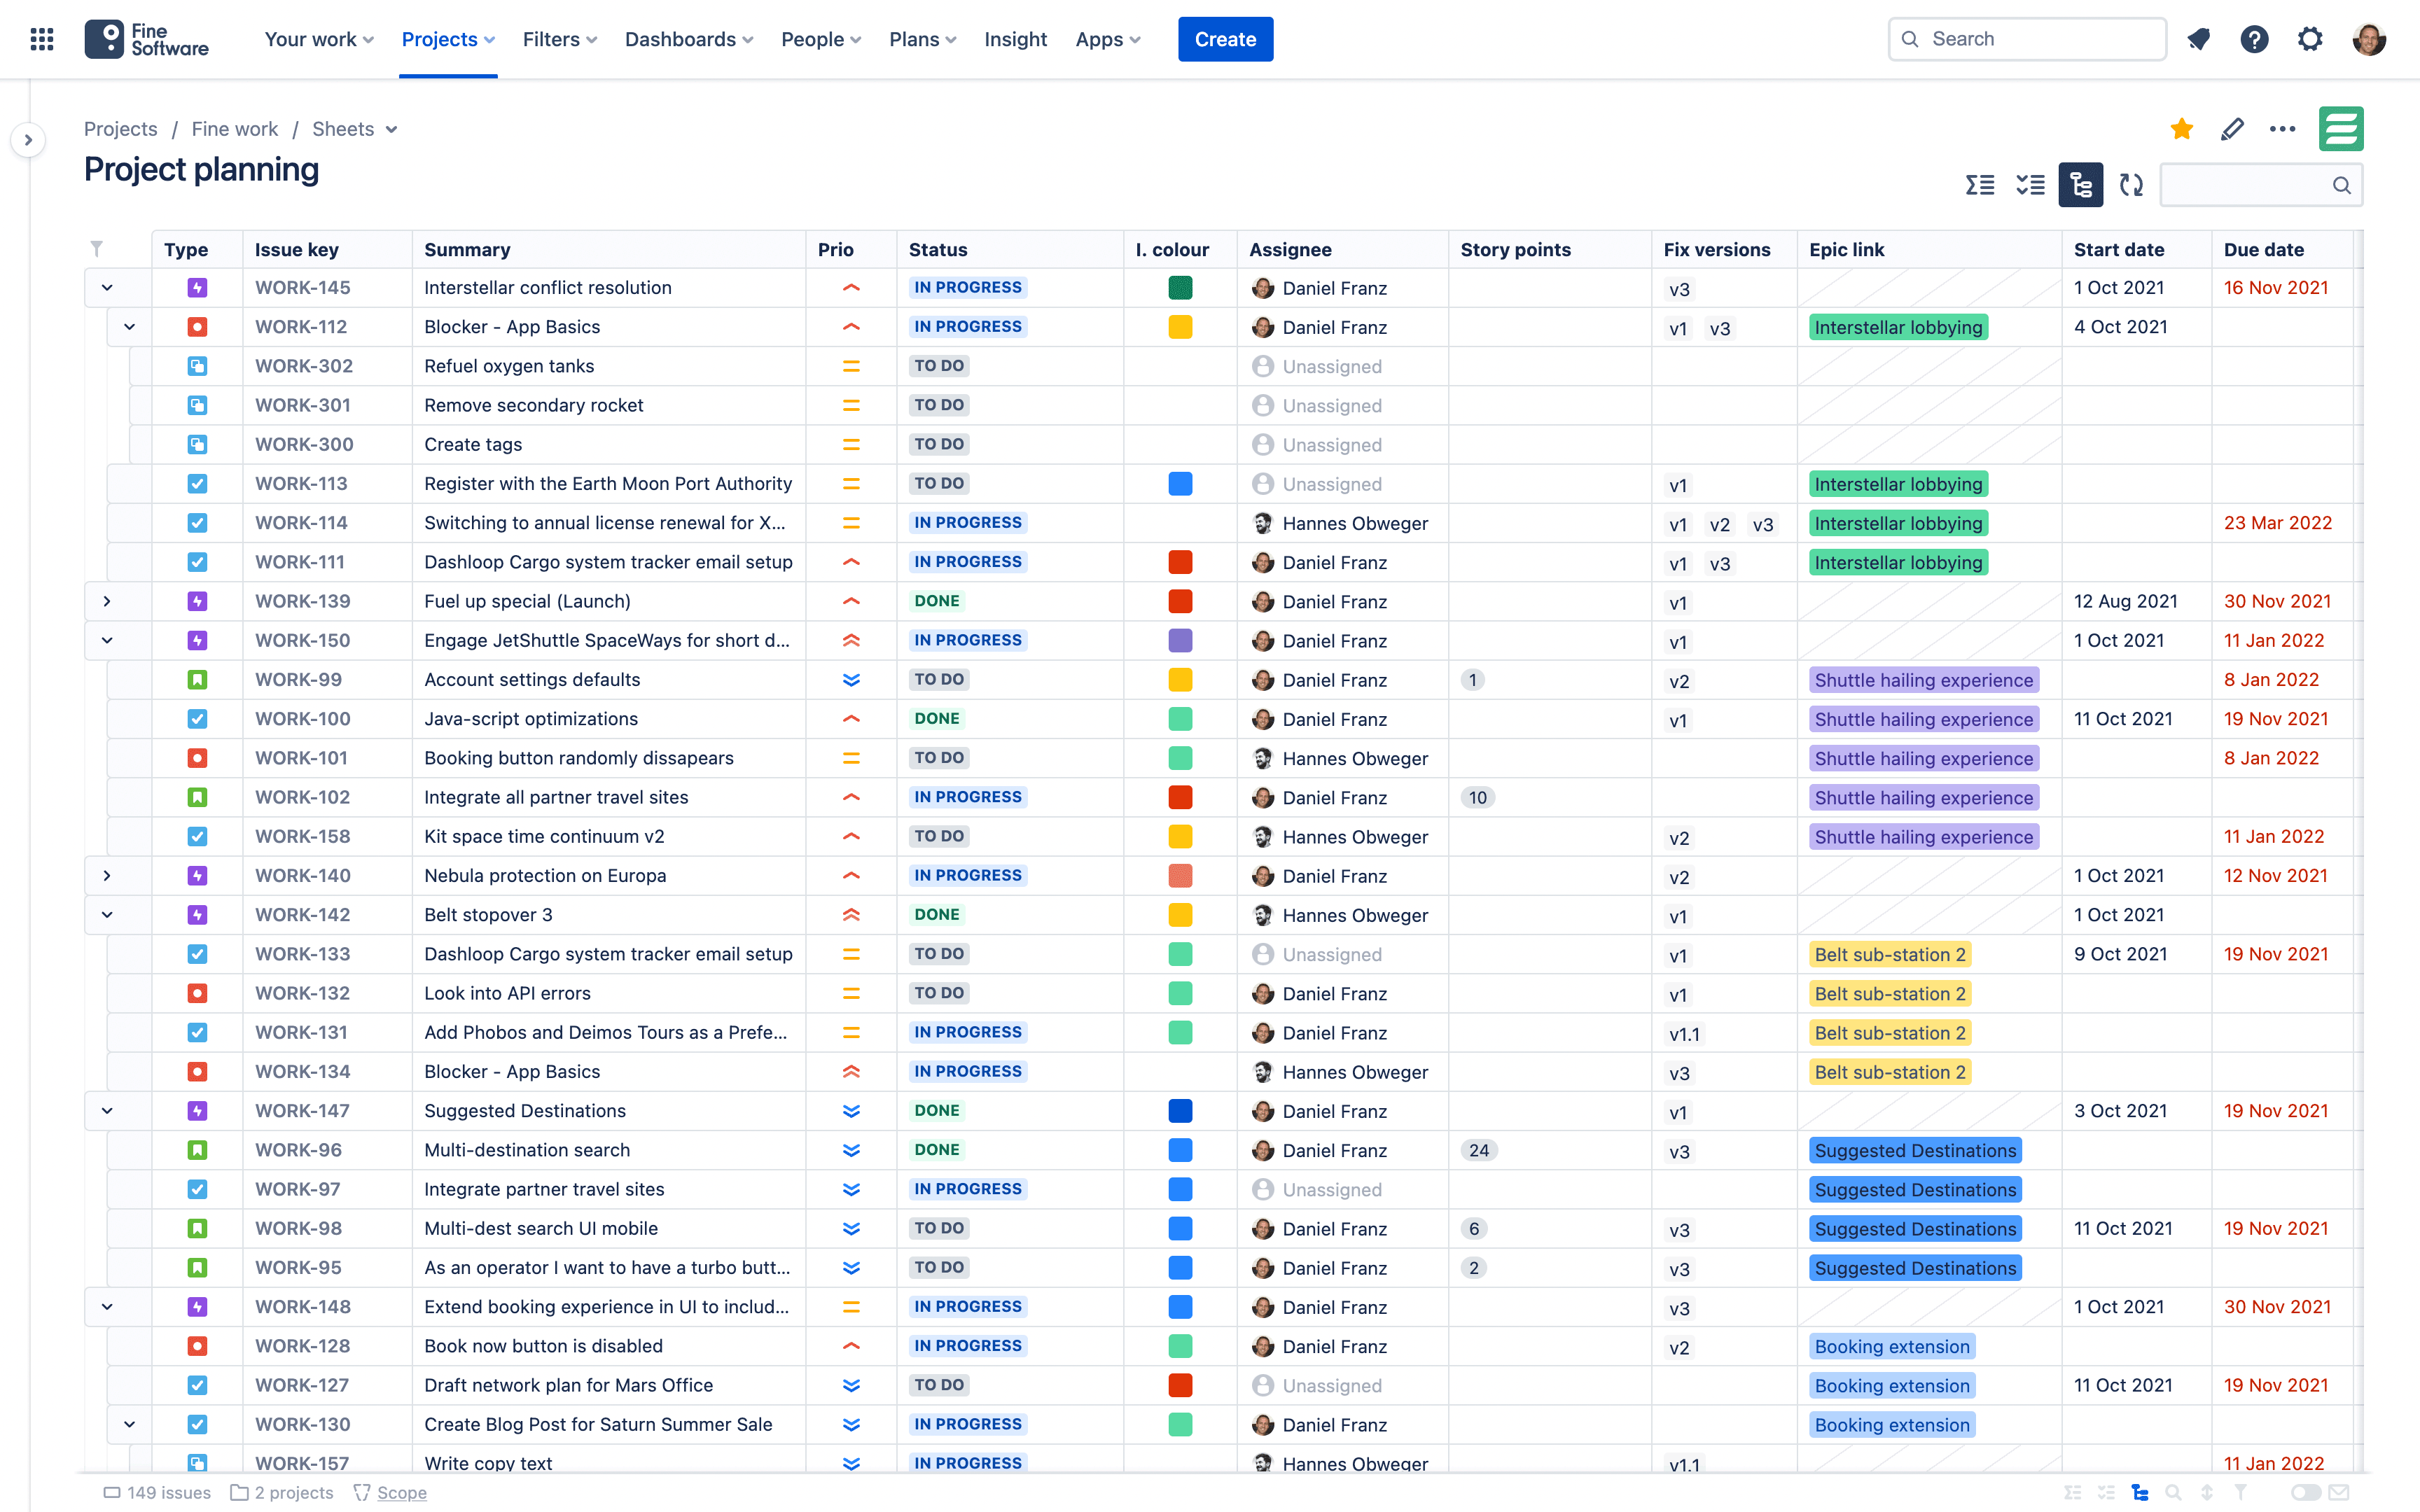
Advanced Roadmaps levels
The default Hierarchy recognises Sub-task level, base issue level, and Epic level of Issue types. For any levels above that, configured via Jira Advanced Roadmaps settings (opens new window), or any self-defined hierarchy, create a custom Structure in your Sheet.
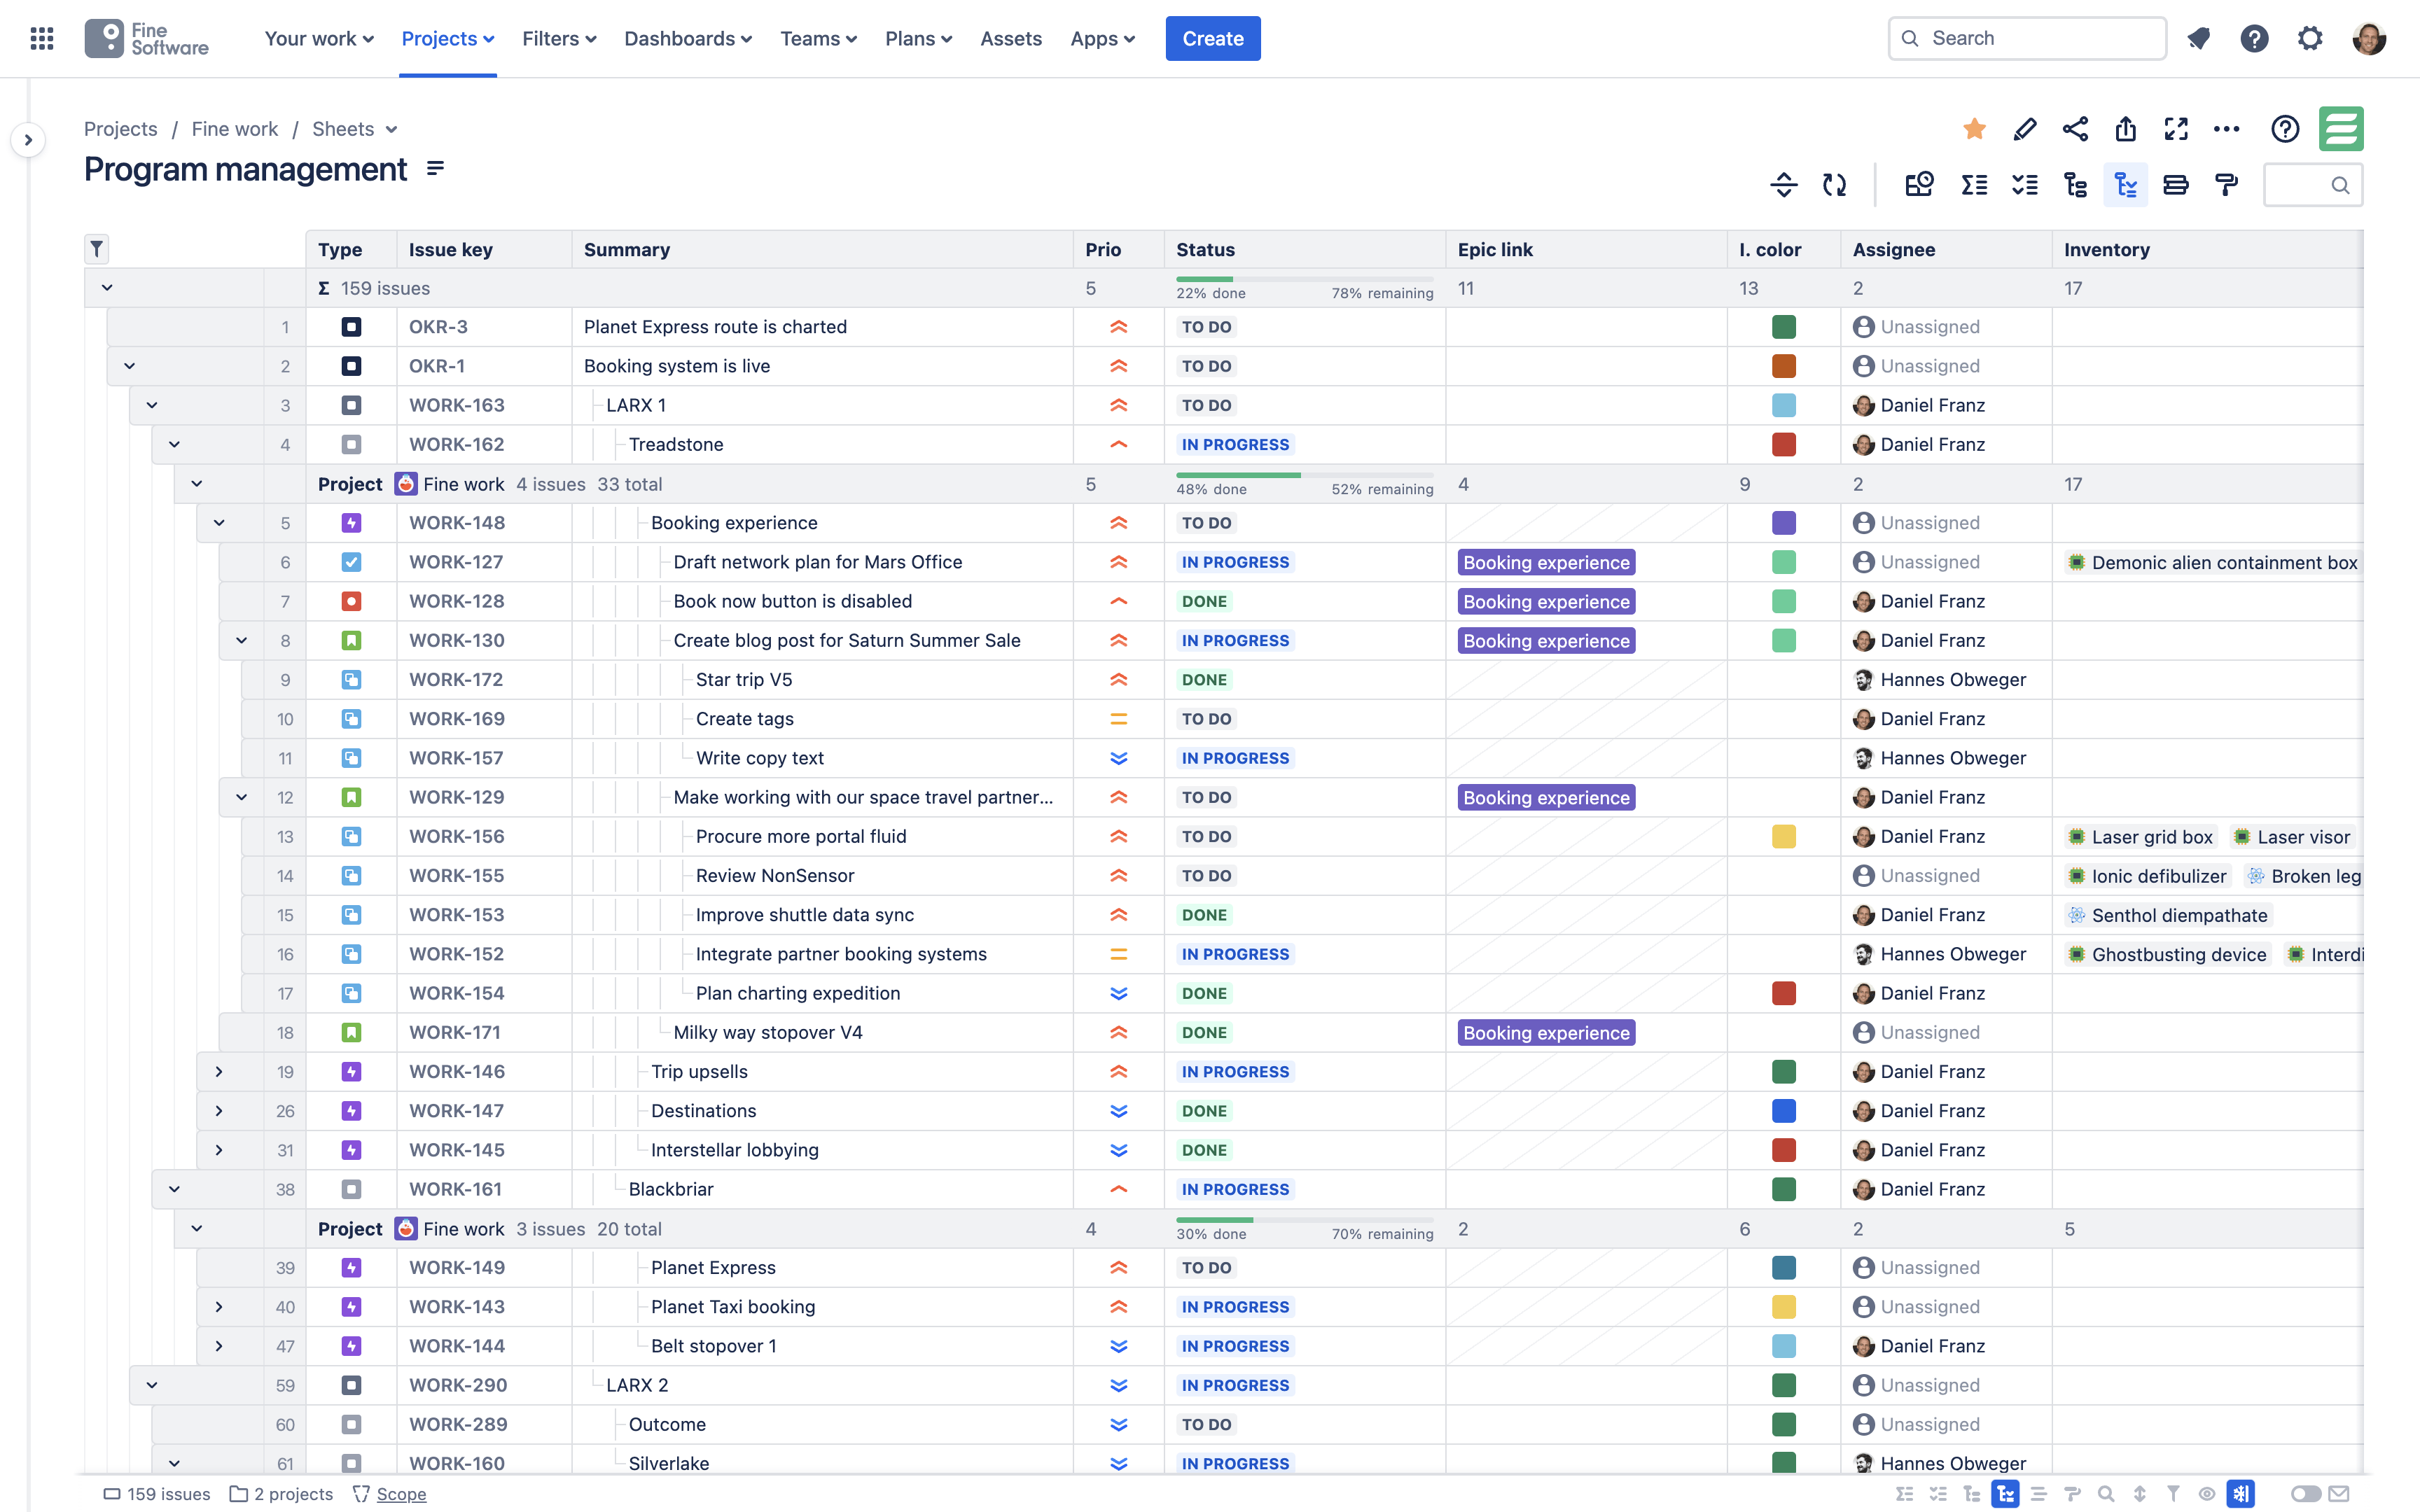
# Custom issue structure v1.2.0
Custom Structures are hierarchical issue constructs that you can freely define by creating Levels. Each Level can either add Hierarchy, a Grouping, Sum-up, or Grouping and sum-up to your Structure.
Keep in mind
To create, edit and delete Structures in a Sheet you need to have Permission.
Creating structures
To create a new Structure in a Sheet, click the
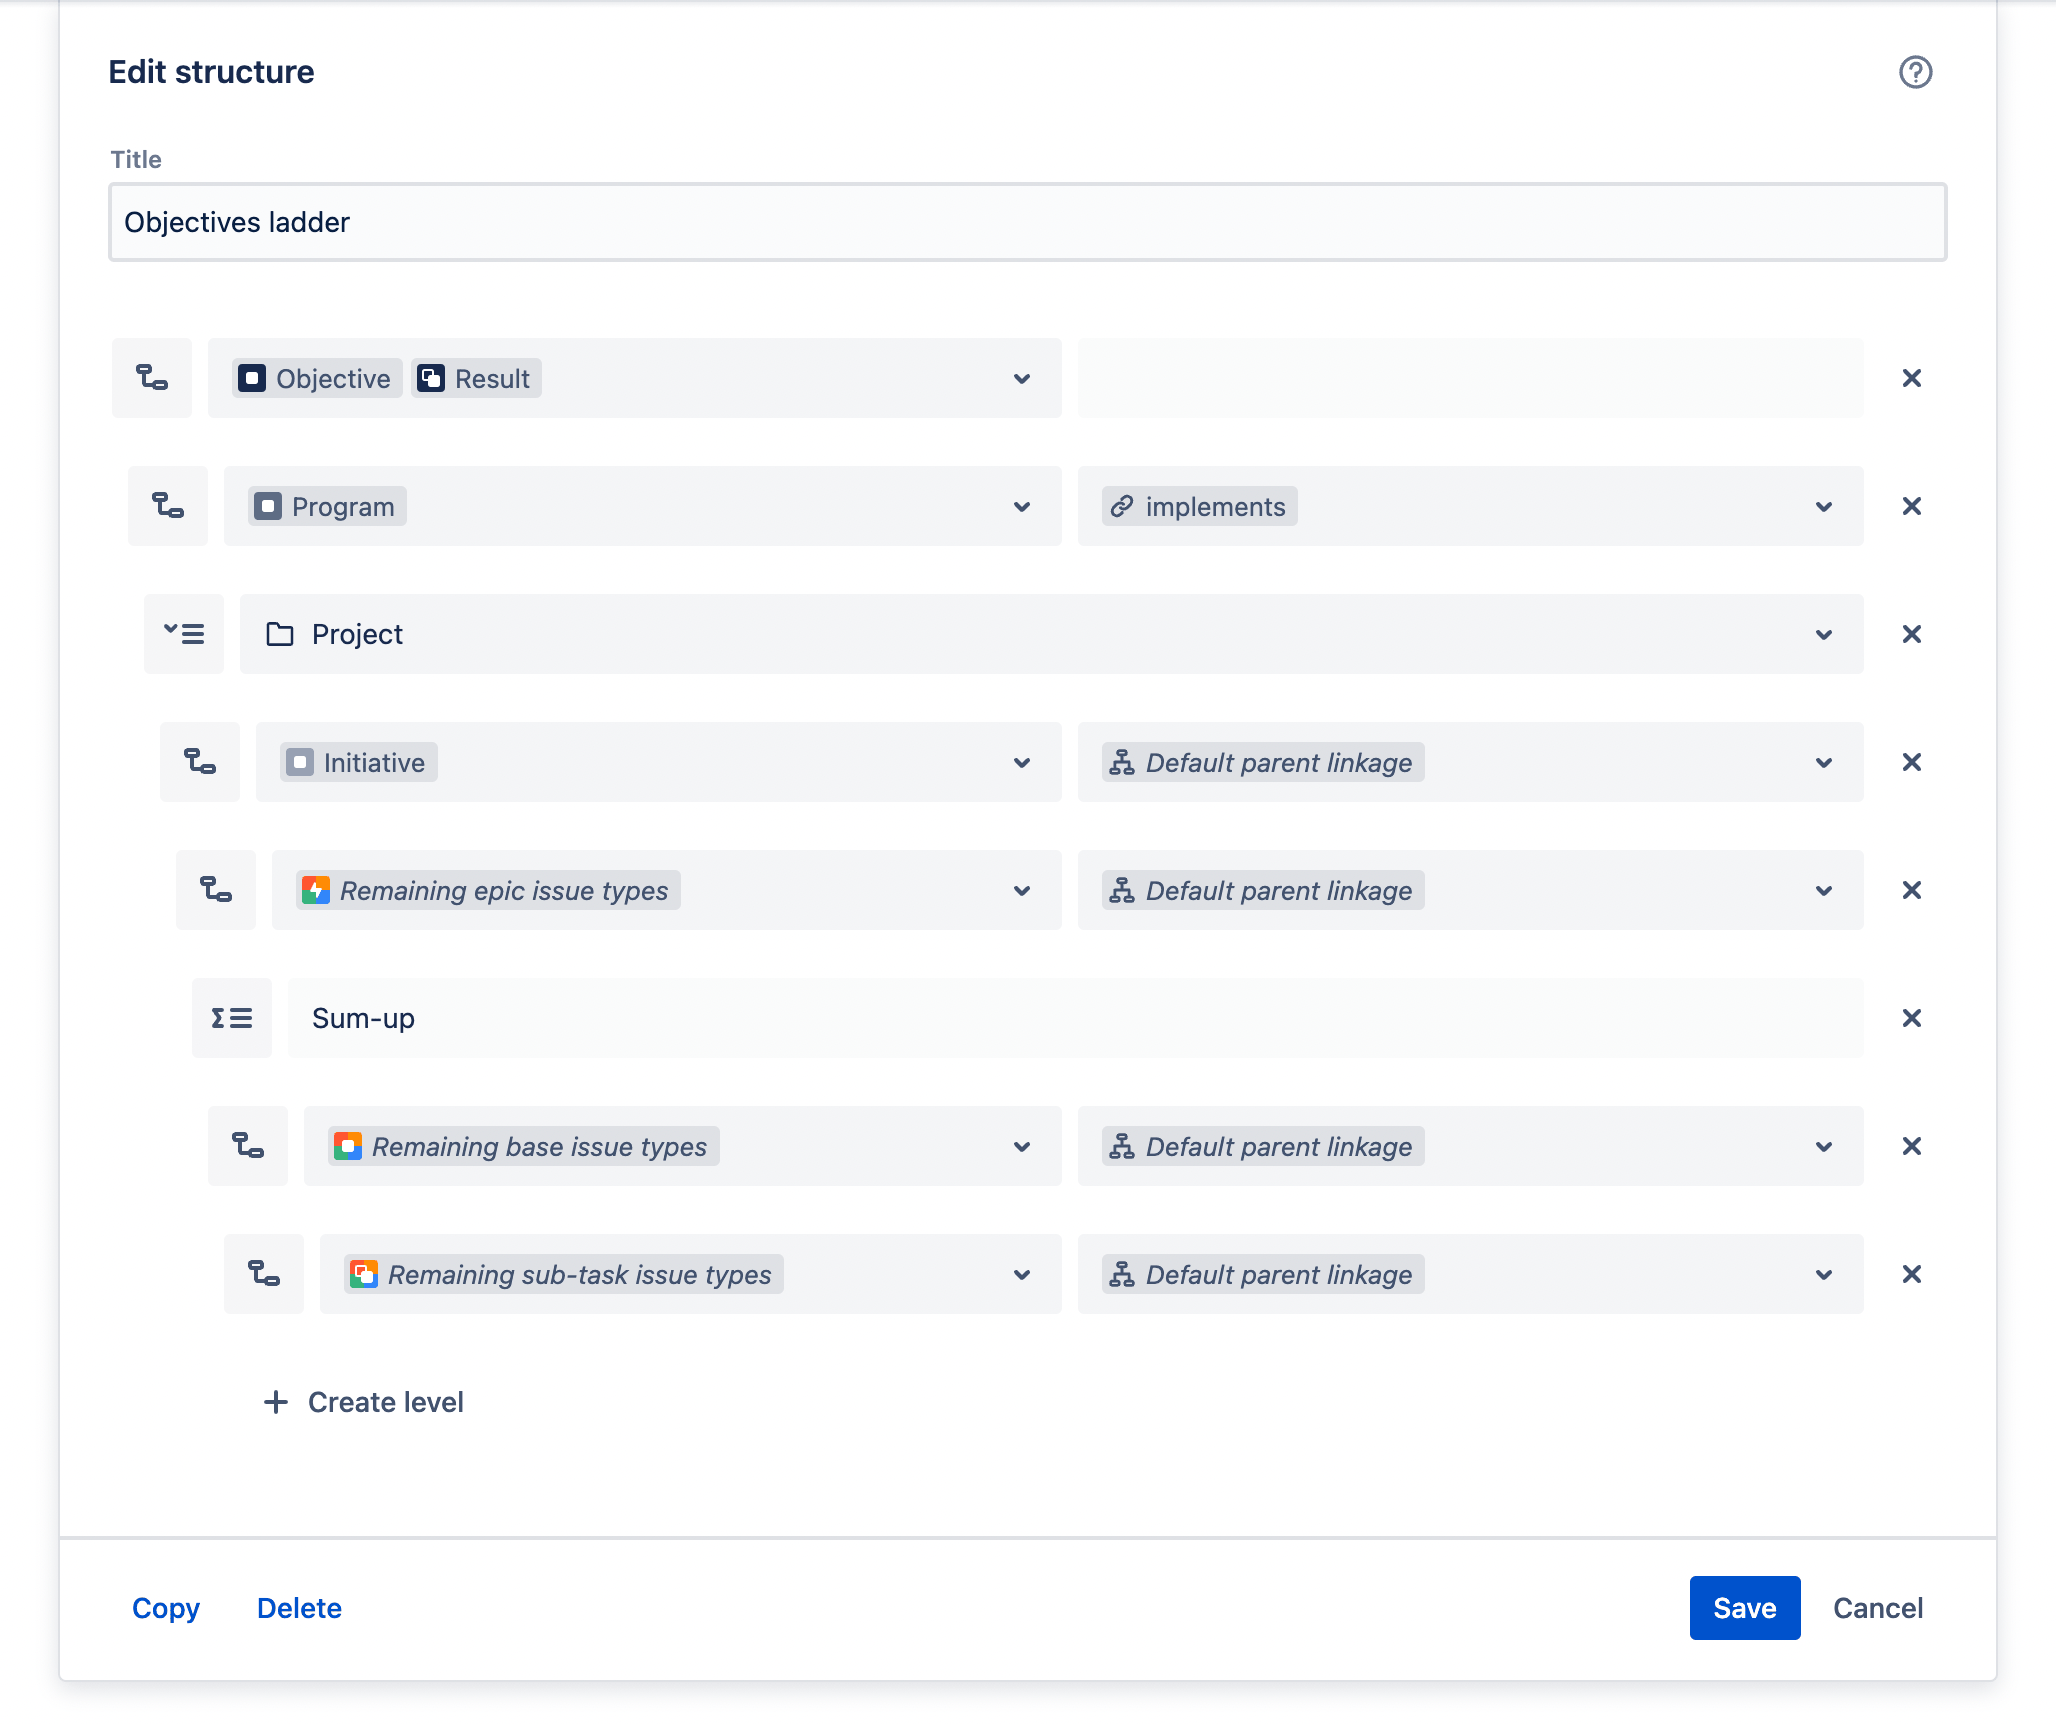
To define a custom Structure, you can create Levels by clicking the
For Hierarchy you need to define Issue type and Parent relationship.
Issue type
Choose one or multiple Issue types and/or Issue type wildcards (e.g.All epic issue types or Remaining sub-task issue types or Remaining issue types, etc.) per Level. Parent relationship
Define how hierarchical relationships between the Level and its parent Level are indicated, by choosing one or multiple of the following:Parent field (Cloud) Parent, Epic link, Parent link fields (Data Center)
This uses the Jira default Fields to determine relationships, i.e. in Jira Cloud the Parent Field, and in Jira Data Center Parent for Sub-task issue types, Epic link for Base issue types, and Parent link for any relationships between Issue types defined in Jira Advanced Roadmaps settings (opens new window).Linked issues
This uses inward and outward Issue link descriptions from the Linked issues Field to determine relationships (Issue linking (opens new window) has to be enabled and can be configured inJira settings).
Issues can appear more than once across the hierarchy v2.3.1
If individual Issue types are mapped to more than one Level of your Structure, or if you are using Issue link descriptions for your Parent relationships, a toggle switch appears. You can decide whether affected Issues should be listed once (default) or multiple times in the table. Depending on the use case of your Sheet, either might be intended behaviour.
Enabling and disabling structures
To enable a custom Structure in a Sheet, click the
Editing structures
To edit an existing Structure in a Sheet, click the
(Alternatively, click the
Copying and deleting structures
To copy or delete a Structure in a Sheet, click the
(Alternatively, click the
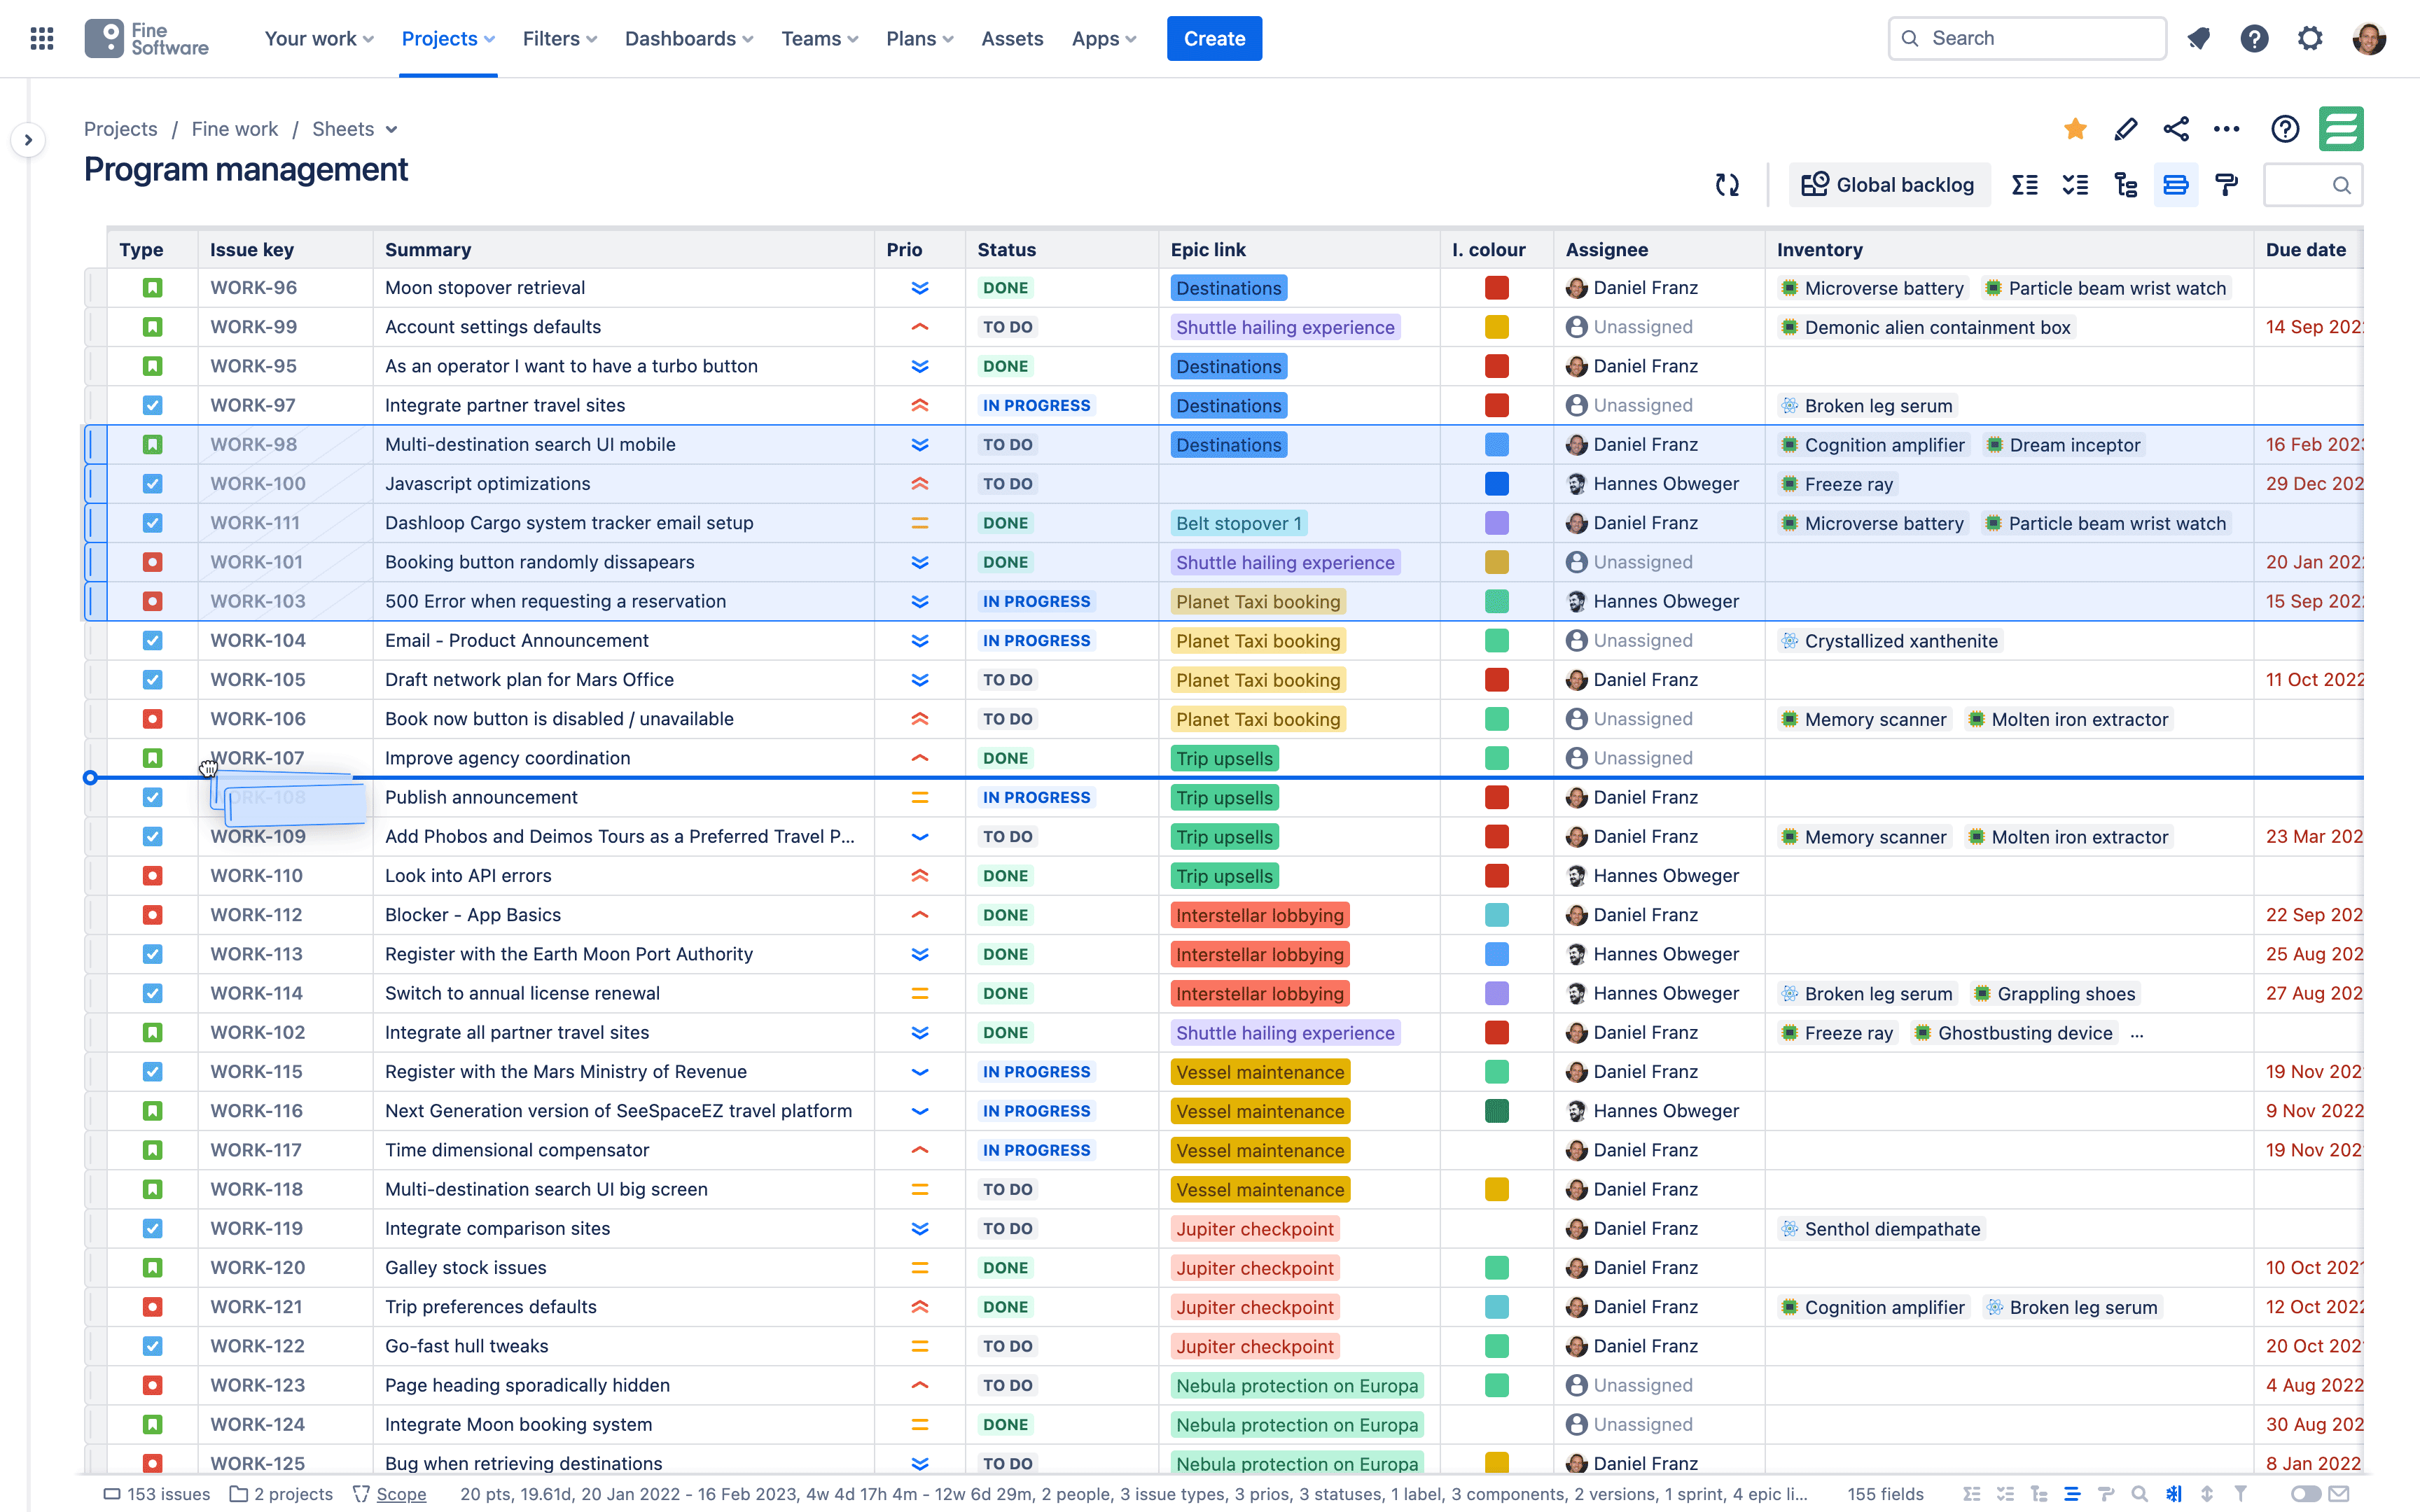
# Grouping issues v1.4.0
To group Issues by a column or Field, click the
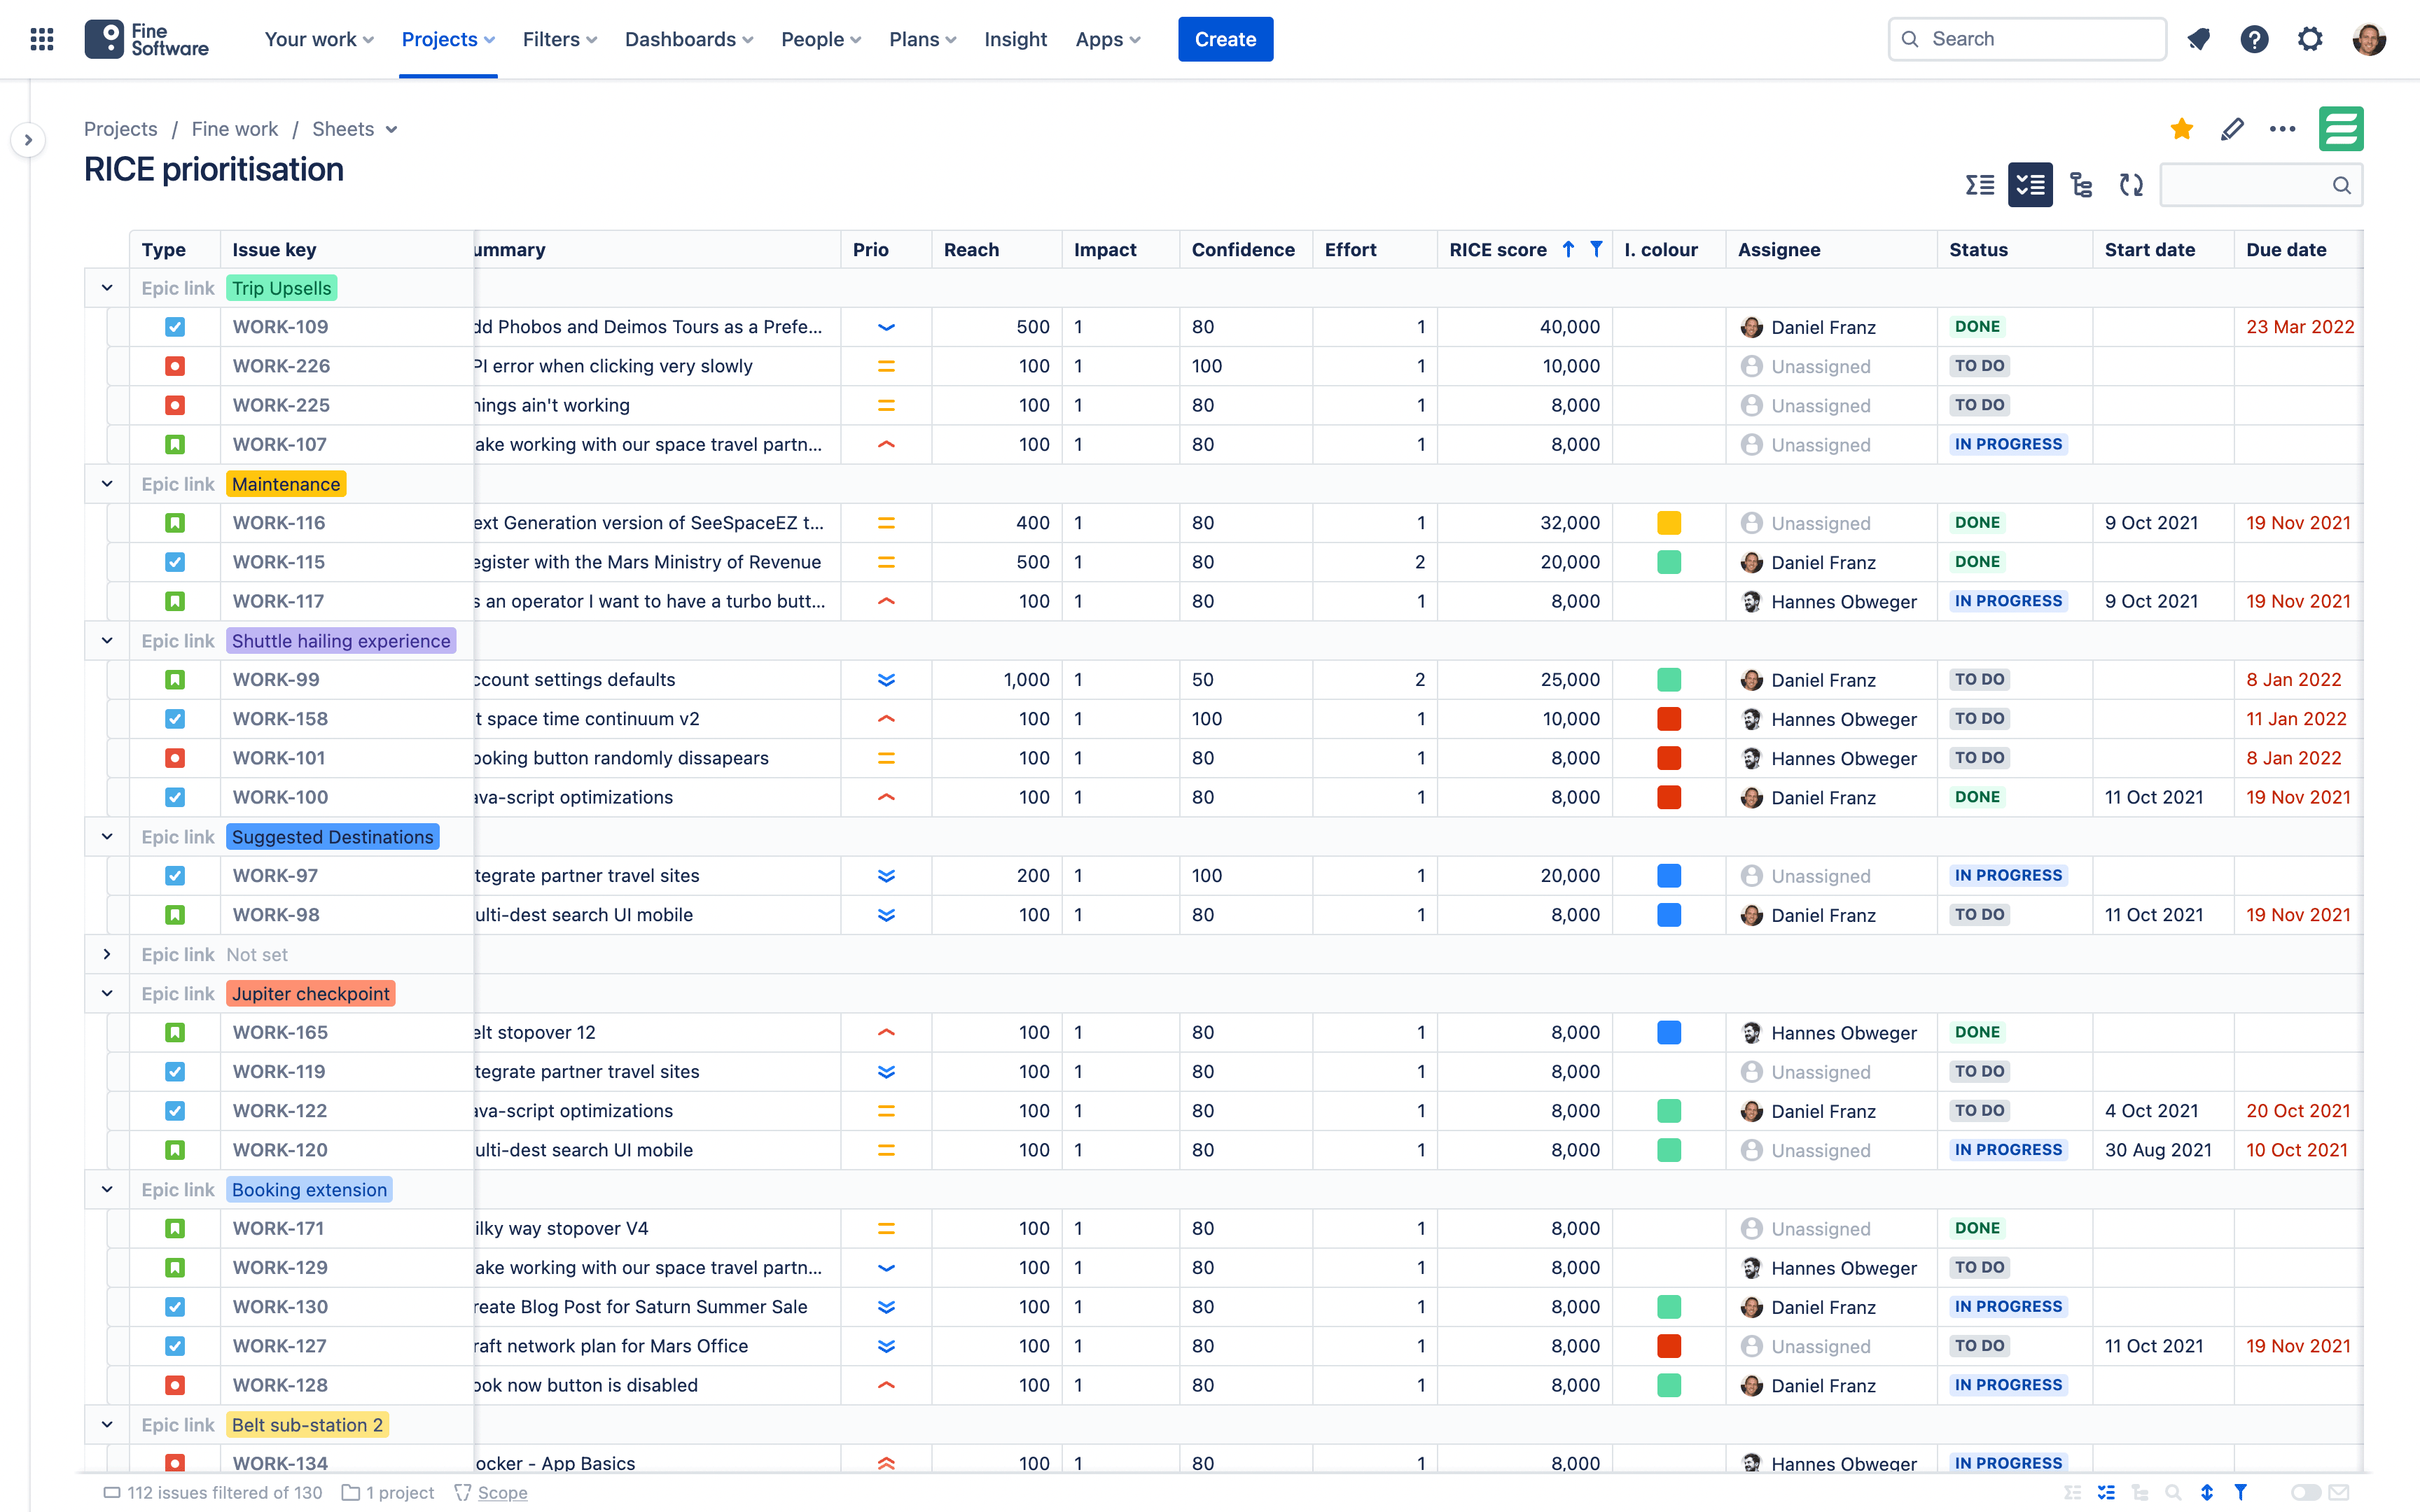
If you would like to add Sum-ups to the Groupings, click the
Multiple nested groupings
The Grouping feature organises your Issues by one column or Field only. If you would like to organise your Issues by multiple columns or Fields, i.e. in multiple nested Groupings, use the custom Structure feature instead.
# Sum-ups v1.5.0
To sum up the contents of the table or to add Sum-ups to Groupings, click the

For some Field types, e.g. numbers, story points, time tracking and status Fields, you can choose between different sum-up styles, including:
- Count
- Sum
- Average
- Median
- Minimum
- Maximum
- Percentile v3.1.1
- Status done - Percentages
- Status done - Totals
- Status done progress bar - Percentages
- Status done progress bar - Totals
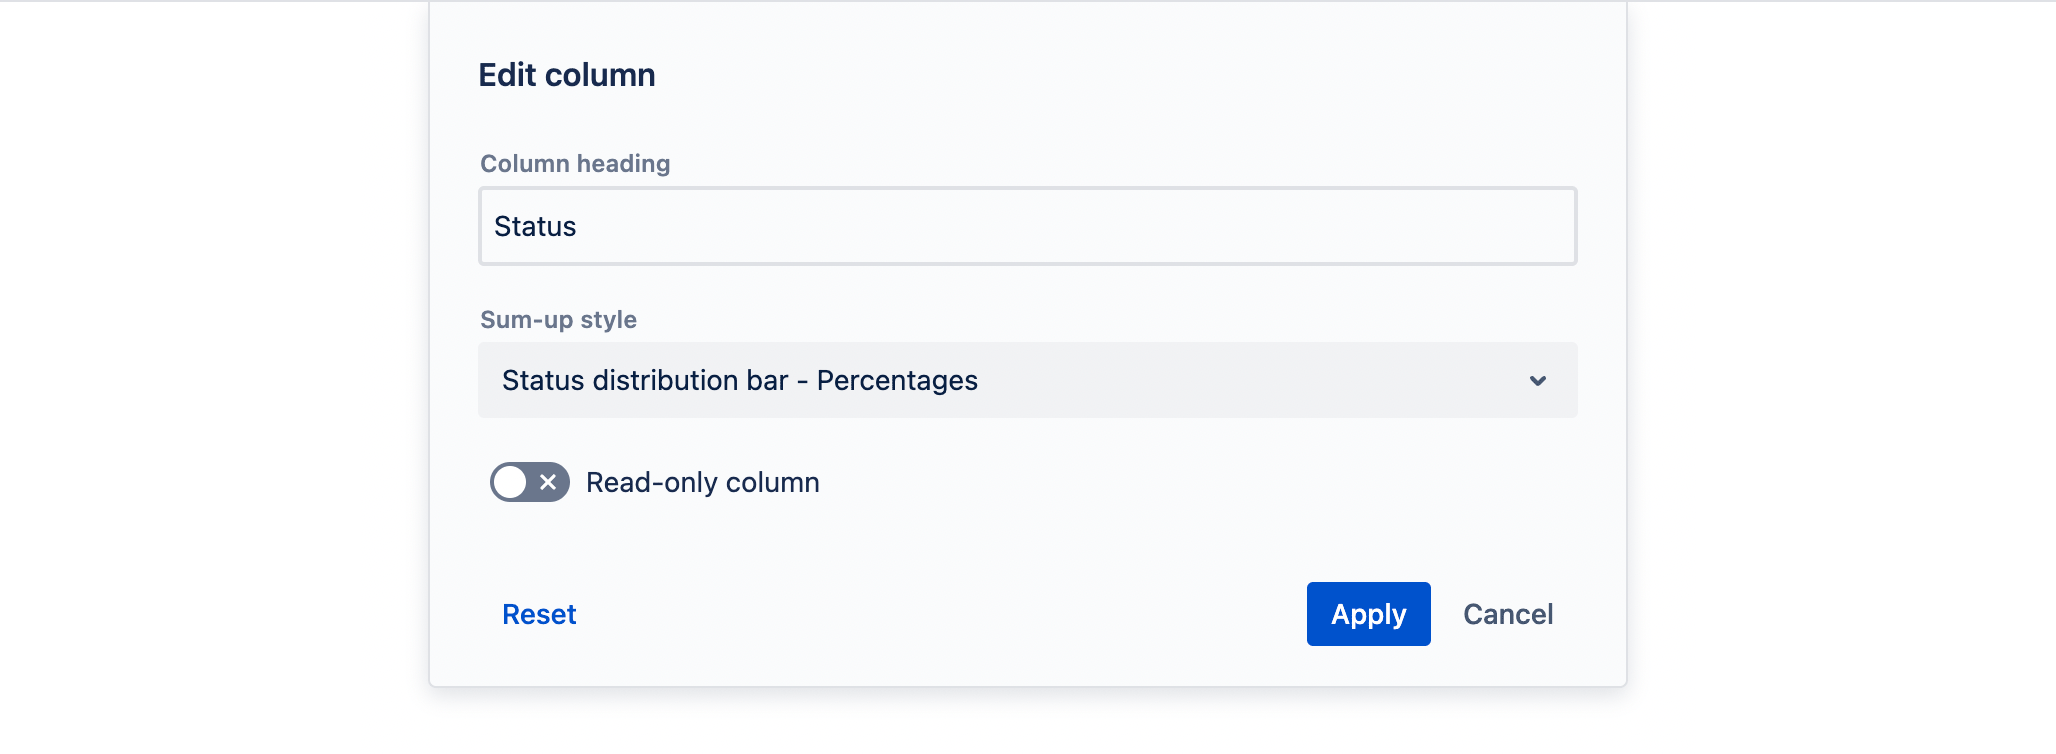
- Status distribution bar - Percentages
- Status distribution bar - Totals
To set the sum-up style of a column, hover with the cursor over the header of the relevant column, a
Alternatively, edit a sheet (click the
# Ranking issues v3.0.0
Keep in mind
To use the issue ranking feature in JXL for Jira Data Center, you need to have Jira Software Projects licensed in your Jira site. You also need at least one Global rank Field in the system. (Out of the box, Jira comes with one Global rank Field named Rank.)
To enable Issue ranking, click the
To disable, click the button again. If you have multiple Global rank Fields in your site, the menu appears again, choose None. Alternatively, click the
While ranking is enabled, Issues in the table are sorted using the values of a Global rank Field. Any other potentially enabled Column sorting and any ORDER BY clause you might have defined in the Sheet scope are ignored.
To re-rank Issues, select one or more row handles to the left of the table. Once you have made your selection, click again and hold the selected row handles to grab the rows, move the cursor to drag the rows to the desired position in the table, and release to drop them.
# Re-positioning issues v4.0.0
While you have enabled a Structure or Issue hierarchy or Grouping, you can drag and drop table rows between hierarchical levels and groupings. This updates all relevant Fields that are used as grouping criteria or to determine hierarchy for the affected Issues.
To re-group or re-level Issues, select one or more row handles to the left of the table. Once you have made your selection, click again and hold the selected row handles to grab the rows, move the cursor to drag the rows to the desired position in the table, and release to drop them.
# Conditional formatting v2.3.0
Table cells and rows can be configured to change format if column or Field values meet specified conditions. For example, if they contain a particular word or phrase, or fit within a particular number, time or date range.

Keep in mind
To create, edit and delete Conditional formats in a Sheet you need to have Permission.
Creating conditional formats
To create a new Conditional format in a Sheet, click the
A Conditional format consists of a Condition, a Format, and one or multiple Rules to apply. To get started, choose a column or Field to test in the Condition. Depending on the type of the column or Field you choose, there are various types of Conditions available.
Text - Matches text strings
Numbers - Matches number ranges
Times - Matches time ranges
Dates - Matches date or datetime ranges
Formula - Matches a JFL advanced search query Coming soon
You can also decide whether you want to target the whole table row or a specific column, and choose between various types of Formats.
Colours - Cell or row background colour is changed
Symbols - Cell value is masked with a symbol Coming soon
Data bars - Cell background is horizontally filled 0-100 % Coming soon
Sparklines - Tiny graphs plotted in the cell background Coming soon
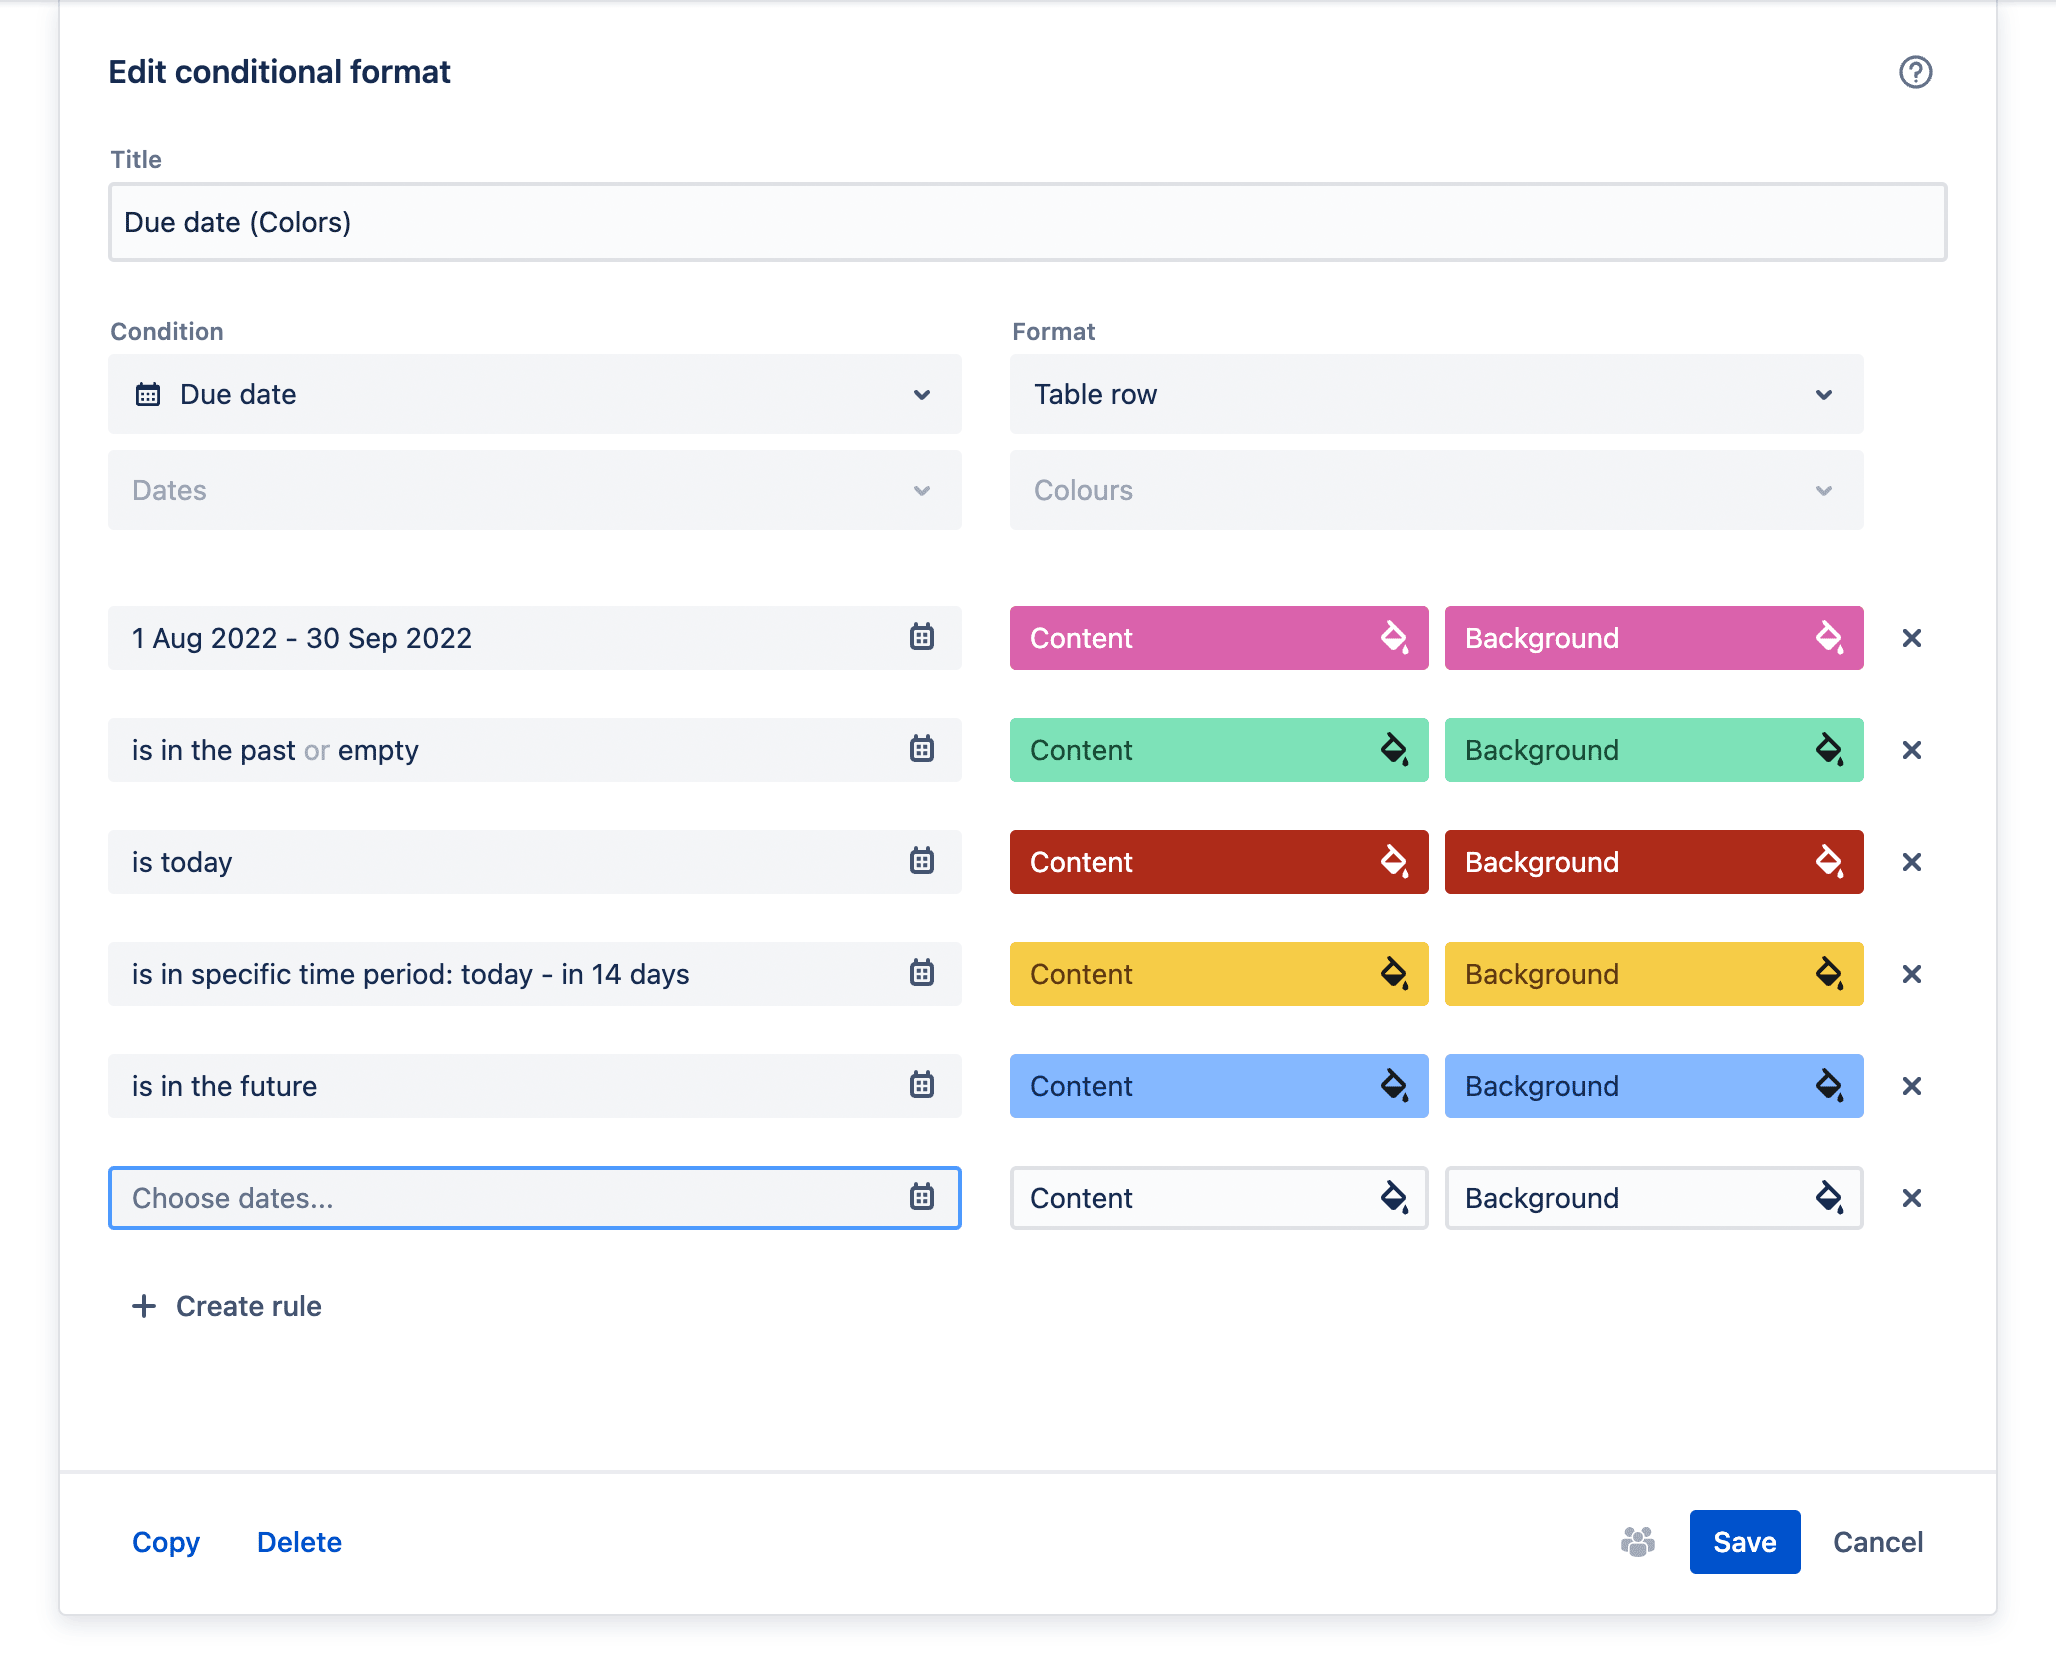
Once the types of Condition and Format are defined, you can create and delete Rules by clicking the
Keep in mind
The order is important. Within a Conditional format, if the Conditions of multiple Rules overlap, the top-most Rule will be applied. If the Rules of multiple Conditional formats overlap, the top-most Conditional format will be applied.
Ordering conditional formats
JXL for Jira Data Center v2.3.0 − v.4.3.0
To change the order of Conditional formats, click the
To change the order of Conditional formats, click the
Enabling and disabling conditional formats
To enable a Conditional format in a Sheet, click the
Editing conditional formats
To edit an existing Conditional format in a Sheet, click the
Copying and deleting conditional formats
To copy or delete a Conditional format in a Sheet, click the
(Alternatively, click the
# Saved views v2.4.0
All the above described features as well as view preferences are enabled and disabled individually per User. However, frequently used states and combinations of them can be saved as Views in a Sheet, and then shared with other Users, easily switched between, etc.
Keep in mind
To create, edit and delete Views in a Sheet you need to have Permission.
Creating views
To create a new View in a Sheet, configure and enable all features and preferences you'd like to save, click the
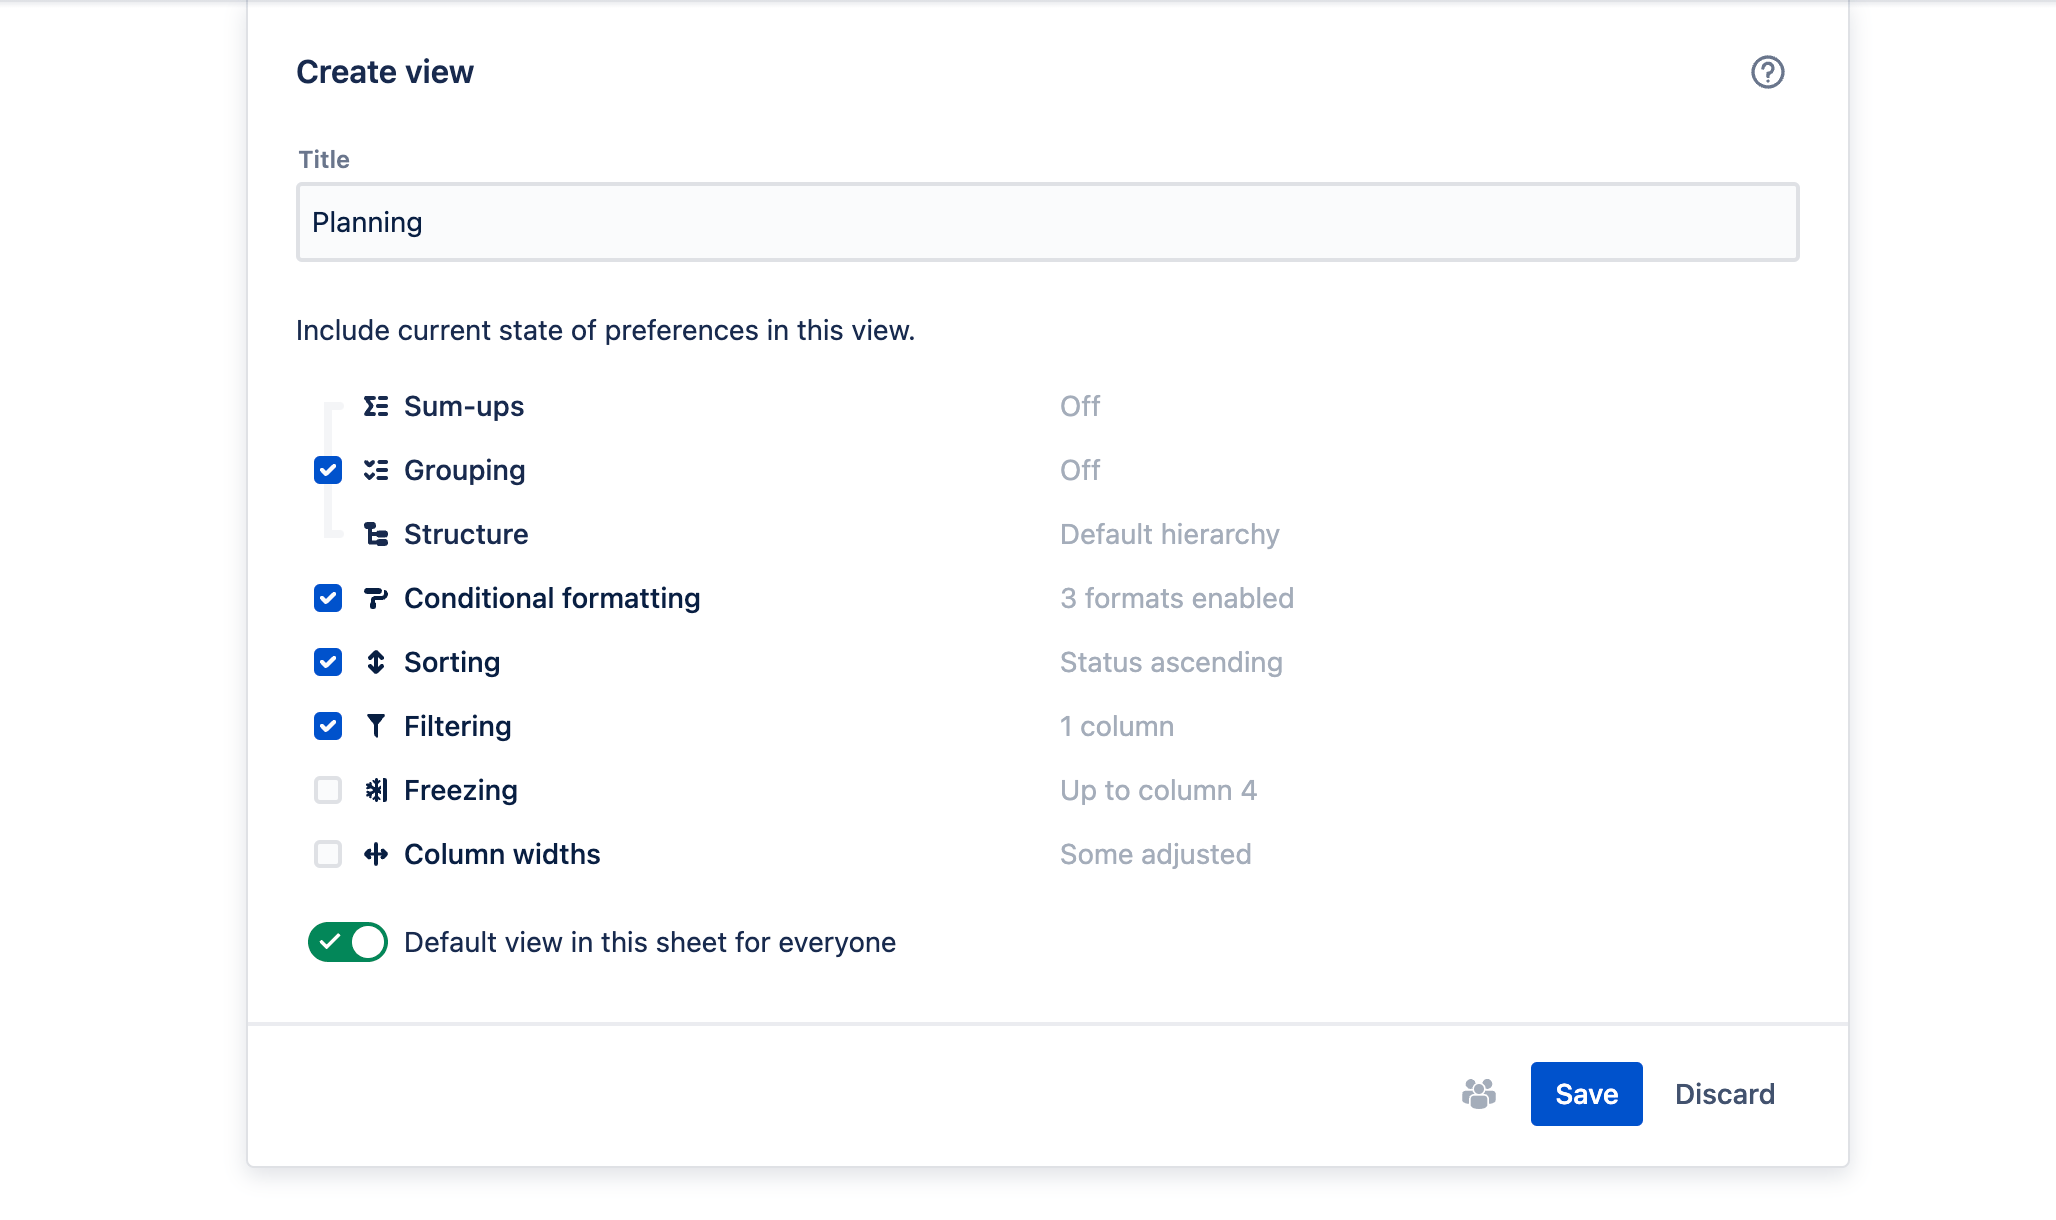
Activate the checkboxes next to the features and preferences that you'd like to save in your View and click the Save button.
Enabling, disabling, and switching between views
To enable a View in a Sheet, click the
Resetting views
If you have made temporary or accidental changes to features and preferences and you'd like to reset a View to its original state, click the
Editing views
To edit an existing View, first enable the relevant View and make the desired changes to the features and preferences in the Sheet. Then click the
In the dialog that opens, the changed features and preferences are listed and you can again choose which of them should be saved in your View by activating and deactivating the checkboxes next to them. Click the Save button to commit your changes.
Deleting views
To delete a View in a Sheet, enable the relevant View, click the
# Formulas
Stay tuned
This feature is not released yet.